


Sunlite Twinwall – A Quick Installation Guide
Lightweight, durable, and impact-resistant, Sunlite Twin Wall is an ideal option for roofing and glazing applications around the home. Whether you’re planning to redesign your pergola façade, veranda, skylight, or decking walls for your commercial or industrial building, you want to ensure you’re doing it correctly.
With structural strength, superior insulation properties, and a dual-layer coating of SunSmart Technology, Sunlite Twinwall allows you to enjoy the outdoors while still receiving maximum UV protection.
Installing the Sunlite Twin Wall means covering the sun’s damaging rays and keeping heat out for ultimate comfort, but how do you install it in your home or workplace? Whether you’re working on residential buildings, a gazebo, shopping malls for a larger project or just want easy access to an installation manual, this article will explore how to prepare for Sunlite installation methods and safe product applications.
Why Follow Installation Instructions?
Although Sunlite polycarbonate is designed for easy installation, it’s important to carefully plan and prepare to achieve the best results.
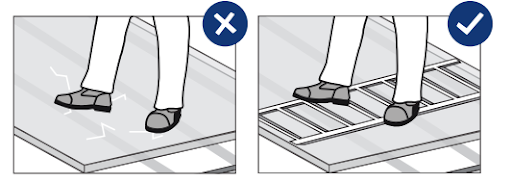
Carefully read all installation instructions before you start, always exercise extreme care when working on a roof, and never directly walk on sheeting. Place a board over three rows of purlins or spread over rafters, and always wear eye protection when using power or cutting tools.
Safety always comes first. When installing Sunlite or doing maintenance work, always consider the sheet unfit to support a person’s weight. Regardless of the kind of glazed roof, use crawling boards or stepping ladders supported by three structural elements of the roof. Depending on the thickness of the twin walls, the rafters only need to be 600 to 800mm apart.
Do you want installation advice or have questions about roofing installation products? The Roofing Options team delivers roofing supplies to Preston, Thornbury, Lalor, and Reservoir areas.
Tools Needed For Sunlite Installation
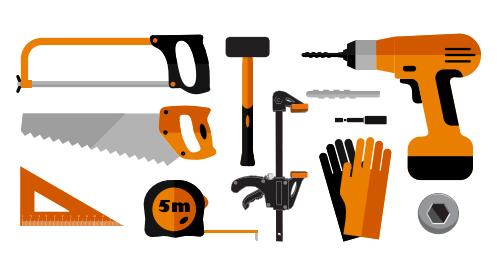
With a range of polycarbonate products at your disposal, what tools do you need to screw-fix Sunlite sheeting? The required tools, such as a tape measure, a fine-tooth panel saw, and an appropriate drill bit for pre-drilling holes, are often standard.
- A cordless drill/driver and 5/16 and 1/4 in hex drivers
- A rubber mallet, clamps, and a tape measure
- A pen or pencil for marking
- A set square, a circular saw, and a hacksaw
- Drill bits and gloves
1-Piece Joiner Installation
Are you new to installing polycarbonate roofing, or are you a seasoned professional wanting to show an apprentice the correct instructions? Let’s look at the different roof types, how to prepare Sunlite sheets and the comprehensive installation guide.
Roof Types
A Sunlite Twinwall can be installed using over two basic roofing types.
Purlins/Battens. With a max batten spacing of 1.2m apart, Sunlite can be installed over purlins/battens. Ensure adequate fall of a minimum of 5 degrees, or 87mm per 1000mm. A good fall keeps the sheeting clean.
Directly onto the rafters. To install directly, the rafter needs to be at 1.0m centres, with the screw spacing on each rafter 500mm.
Preparing Sunlite Sheets
Prepare the Sunlite sheet by cutting and fitting a length of gasket onto the sheeting, trimming the gasket 25mm short of the sheet length, which must equal the length of the joiner. For example, a stand-alone pergola requires a gasket and joiner to be 50mm shorter than the sheet length.
To prepare the sheets before installation, remove 100mm of protective film from the edges of both open sides of the sheet. This allows for the application of sealing tapes.
Apply the breather tape to the top end of the sheet, carefully folding the protruding sides over both sheet faces to cover the internal channels. Make sure that all open channels of the sheet are sealed. Next, apply blocking tape over the lower end of the sheet. Fold the protruding sides as before.
1 Piece Joiner – The Installation Process
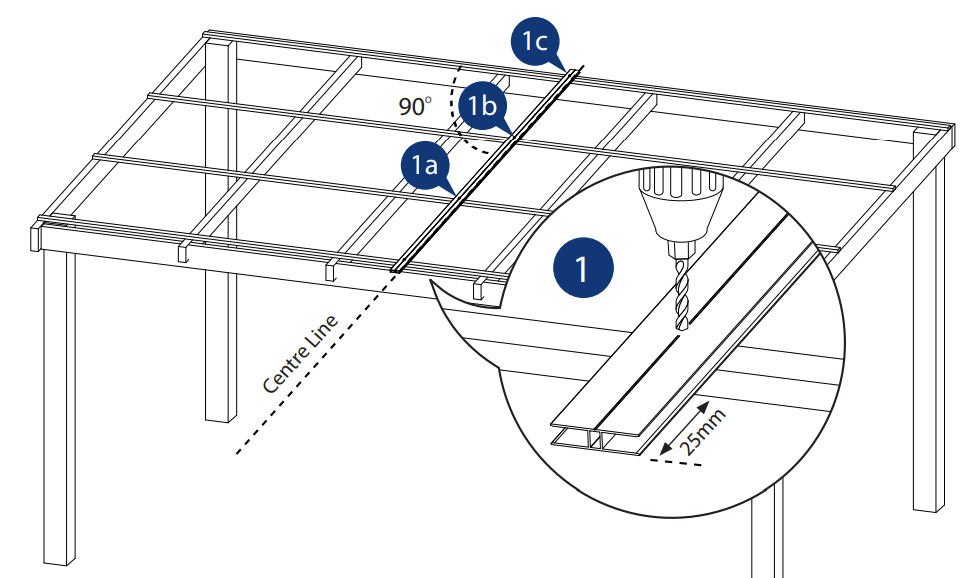
- Pre-drill an 8mm clearance hole in the H-profile over each purlin. If the purlins are metal, use a Metal Hex 12×35 Neo Washer. In this case, pre-drilling is not needed.
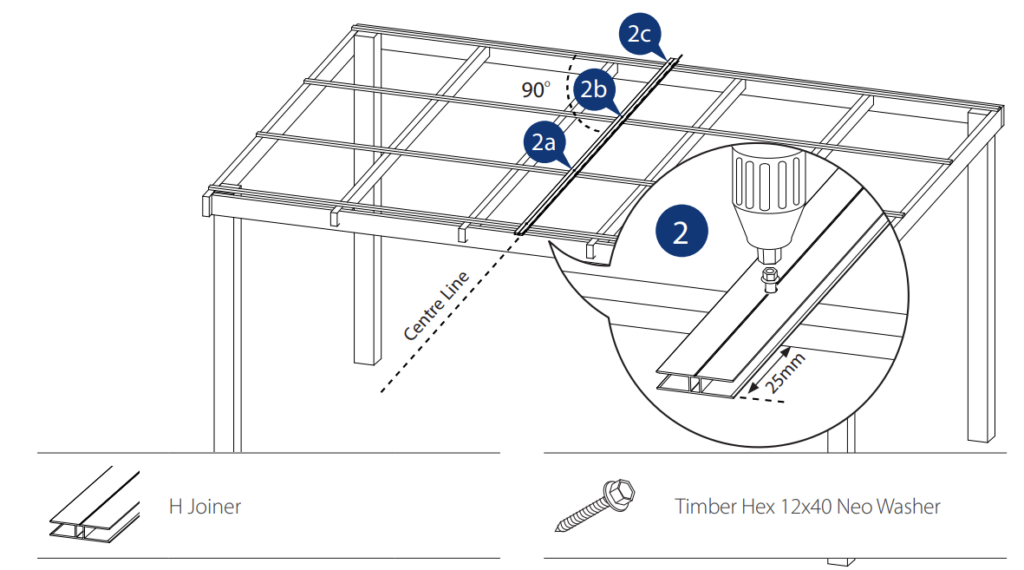
- Fix the H-profile onto the purlins using Timber Hex 12×40 Neo Screws onto each purlin.
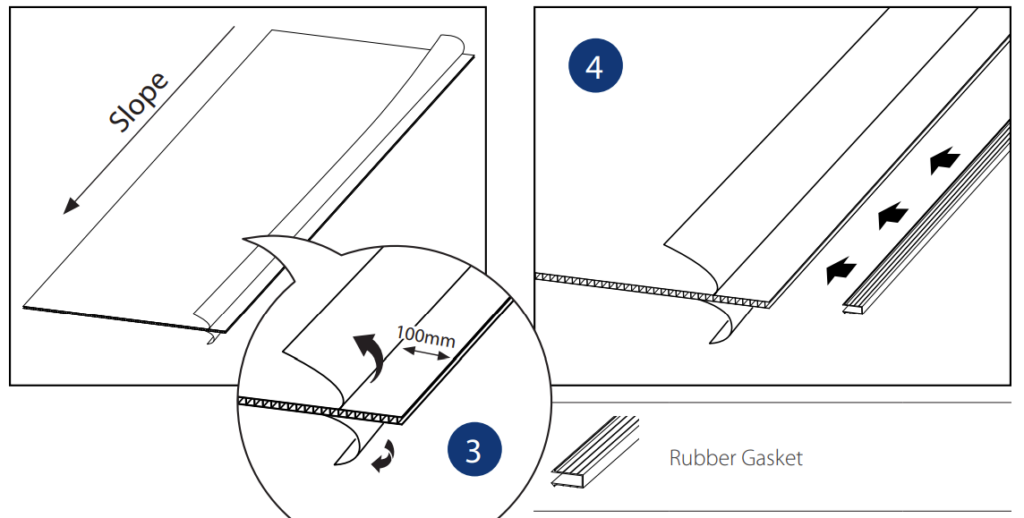
- Peel off the masking along the edges of the length sides at both sides of the sheet. Do this about 80-100mm from the edges, preparing the sheet for the rubber gasket.
- Peel off the masking along the edges of the length sides at both sides of the sheet. Do this about 80-100mm from the edges, preparing the sheet for the rubber gasket.
- Apply the rubber gasket. Always keep the protective film on the sheet until installation is complete. This prevents scratching during the installation process!
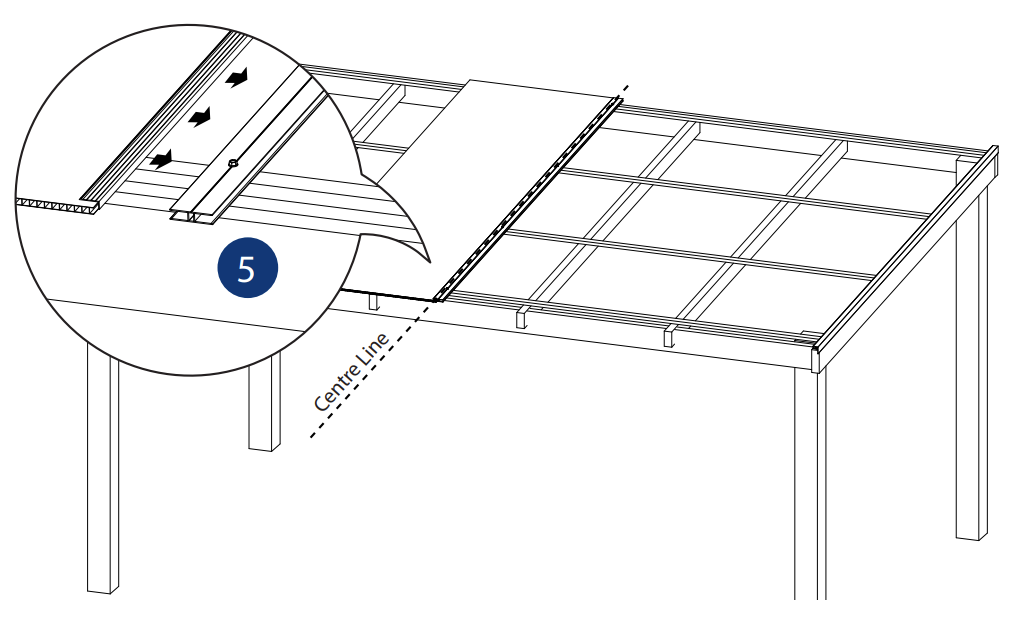
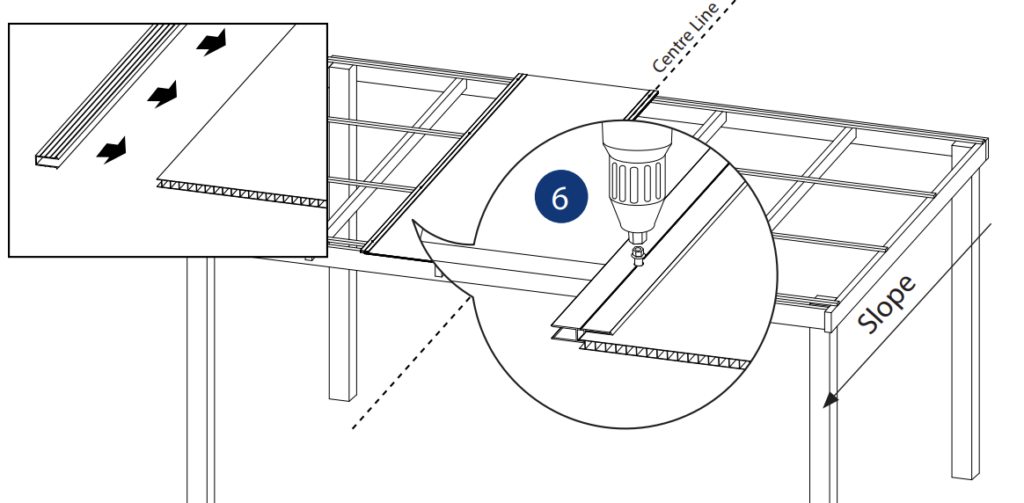
Insert the Sunlite sheet into the joiner until the gasket is firmly wrapped. Apply the rubber gasket and install the Second H-profile, aligning the edges of each H-profile.
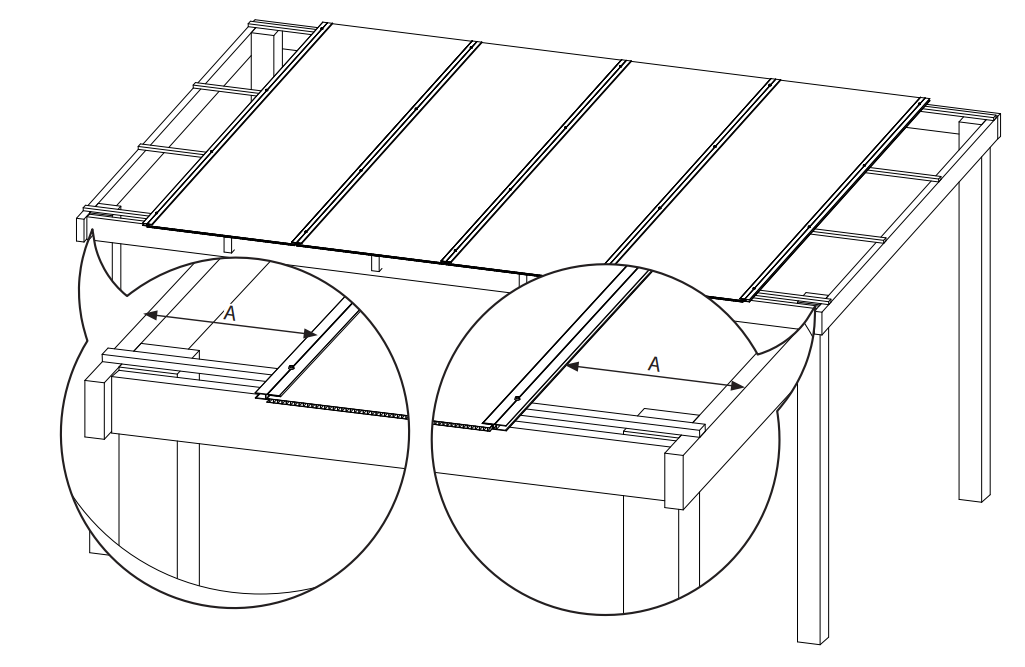
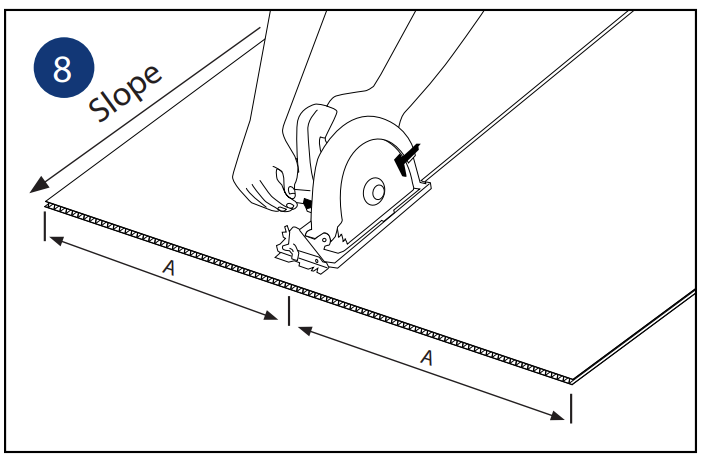
- Install all Sunlite sheets, measuring the width of the uncovered areas on both sides.
- Install all Sunlite sheets, measuring the width of the uncovered areas on both sides.
- Cut the width necessary for both edge sheets, applying the F section to the exterior side of each edge sheet. Apply the rubber gasket to the interior side of each edge sheet. Install the remaining left side sheet and right side sheet.
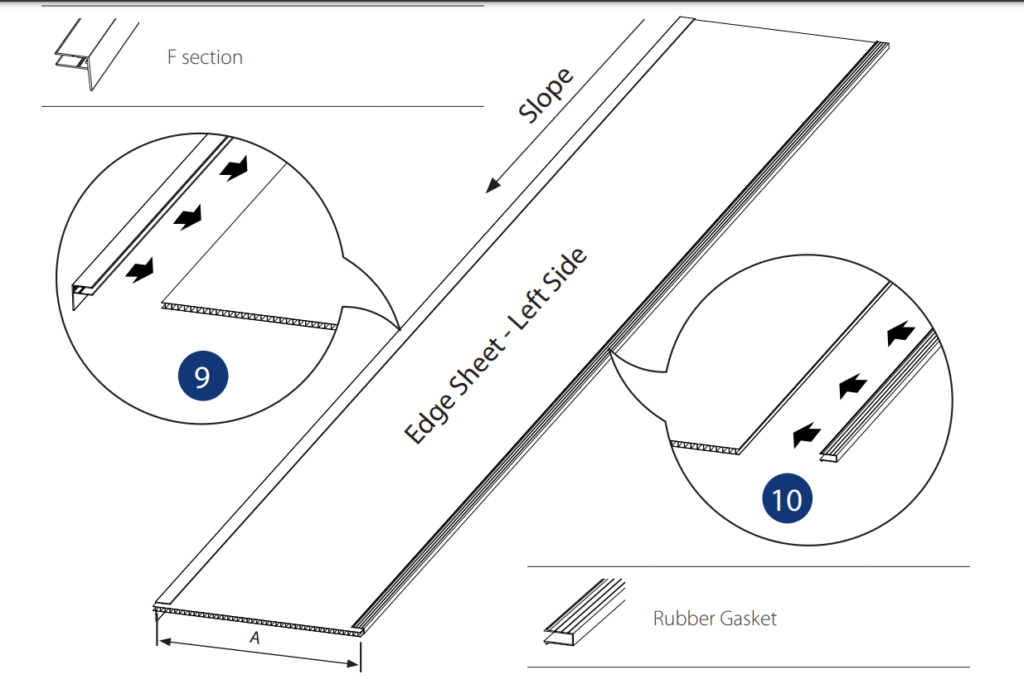
- Cut the width necessary for both edge sheets, applying the F section to the exterior side of each edge sheet. Apply the rubber gasket to the interior side of each edge sheet. Install the remaining left side sheet and right side sheet.
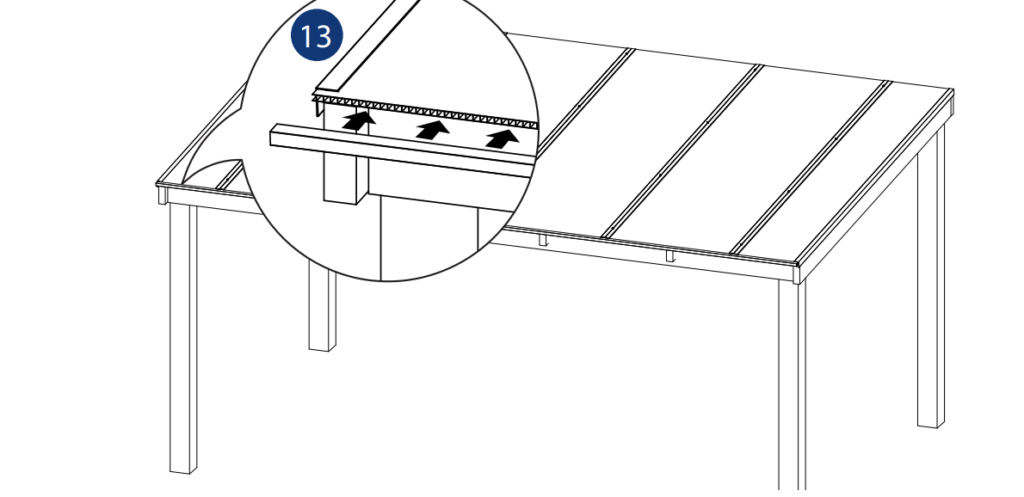
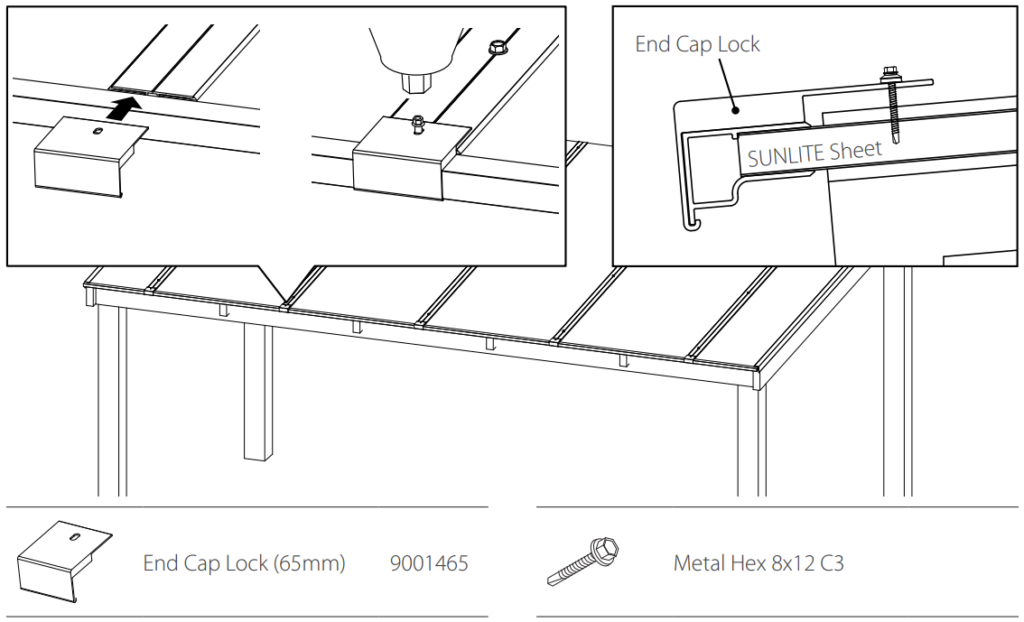
- Align the edge of the sheet end cap to the outside edge of the H joiner. Tap and fit the sheet end cap along the bottom end of the sheeting to ensure a neat fit.
- Align the edge of the sheet end cap to the outside edge of the H joiner. Tap and fit the sheet end cap along the bottom end of the sheeting to ensure a neat fit.
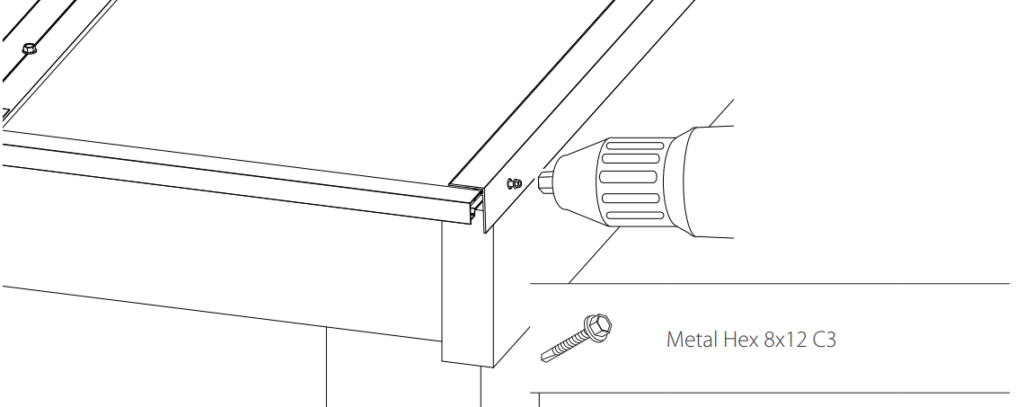
- Fit the end sheet cap lock where joiners meet, fitting the end of the lock over the capillary lip of the sheet end cap for tight fitting. Fix the end cap using a Metal Hex 8×12 C3.
- Fit the end sheet cap lock where joiners meet, fitting the end of the lock over the capillary lip of the sheet end cap for tight fitting. Fix the end cap using a Metal Hex 8×12 C3.
Designated elements such as closures, gutters, trimming, ridge caps, and flashing are not supplied by PALRAM and must be fabricated according to your specific design requirements. For gable/apex roofing types, repeat all steps above and fit a Universal Ridge to the crest of the gable/apex section, fixing with 8g x 20mm hex screws as mentioned above.
If you want to know more about a 2-piece joiner installation, read the Sunlite Installation Guide for specifics on cutting and fitting.
Cutting Sunlite Polycarbonate?
If you’re cutting plastic or clear roof sheeting, this can seem like a big task. However, polycarbonate solid, multi-wall, and twin-wall sheets are easy to cut.
- Firstly, calculate your rafter spacings. There should always be a gap between sheets for glazing bars or an expansion or contraction allowance.
- Measure your cutting positions for an accurate cut. Next, draw a line between the markings using a straight edge of a level piece of timber to create a cut line.
- Choose the correct blade. A fine-tooth blade with upwards-cutting teeth is ideal for a clear, smooth cut! Make sure to clamp the sheeting down for safer cutting.
- Select the highest blade speed available, moving slowly to create a straighter cut. Increase to a medium feed speed once into the polycarbonate sheet, following the line across.
- When reaching the end of the sheet, take care to ensure the offcut detaches safely.
Using a hand saw, do some downward strokes to create an indent. This guides the saw. Cut with the saw at a shallow angle, resulting in a smoother edge and easier cutting!
As for purlin spacing, the maximum for a corrugated roof profile is 800mm when centring the first and last purlins. 1 metre centres are for intermediate purlins. With a Greca roofing profile, 900mm is for the first and last purlins, and 1200mm for the intermediates!
Interested in understanding more about Sunlite polycarbonate? At Roofing Options, we deliver roofing supplies to Frankston, Cranbourne, Clyde, and Officer areas.
Joining Sunlite Polycarbonate Sheets
With polycarbonate sheeting able to be fused, the bond is strong yet barely visible. Methylene chloride carries this method out, but ethylene dichloride can be mixed and used at a 60-40% ratio.
Applying epoxy to a clean part of the polycarbonate that you intend to glue, hold another piece of polycarbonate sheeting against it for five to ten minutes or until the bond is firm.
Allow the polycarbonate plastic to sit for 72 hours before putting it under stress. It can take up to a week for the epoxy to dry completely.
Attaching Polycarbonate Panels to Wood
How do you fix polycarbonate sheeting to timber frames? There is a simple method to fix polycarbonate directly to the frame!
- Always double-check your measurements. You want them to be the right fit for your timber frame, as it can be an expensive mistake if cut too small.
- Prepare the sheeting by pushing back the anti-scratch film and fixing anti-dust tape to the ends of the sheet. Fix the end-stop bar to the polycarbonate, and seal it with sealant to keep it in good condition.
- Once your timber frame is pre-drilled, line up your drilled holes in your polycarbonate sheet with your timber holes. The sheets must be secure enough to withstand strong winds, so too many holes or drilling can weaken the structure.
- Fasten screws onto the sheets. Do not overtighten these screws, as this can damage the sheets and reduce their weather-proofness.
Cleaning Instructions for Sunlite
All Palram products can be cleaned with a soft sponge or cloth made from 100% cotton using lukewarm water and mild soapy water.
Surfaces should be rinsed with cold water and dried with soft cotton cloth to reduce water spotting. In some circumstances, additional cleaning agents must be used. To learn more about cleaning polycarbonate, check out a comprehensive guide to maintaining polycarbonate roof panels.
Reliable Roofing Supplies in Melbourne
At Roofing Options, we understand the importance of correctly installing Sunlite Twinwall polycarbonate sheeting.
Whether you’re a DIY roofer or an experienced professional looking for Laserlite 2000 Polycarbonate, Laserlite 3000 Polycarbonate, Sunglaze, or Suntuf EZ Glaze Polycarb, we have something for every builder.
Contact us today for expert advice on polycarbonate roofing supplies, professional recommendations on Sunlite polycarbonate applications, and how our products ensure your roofing project will last decades.